Todays blog post gives a bit more information about how to effectively use the Qt Quick Effect Maker (see the QQEM introduction blog post). We will first create an example effect using several Qt Graphical Effects and then re-create this same effect using a single QQEM multi-effect. This will be done with the node editor, so no experience of writing a shader code is required.
Intro
It is Monday morning. You are early in work as usual, drinking your morning coffee and checking tasks when email from The Designer arrives.
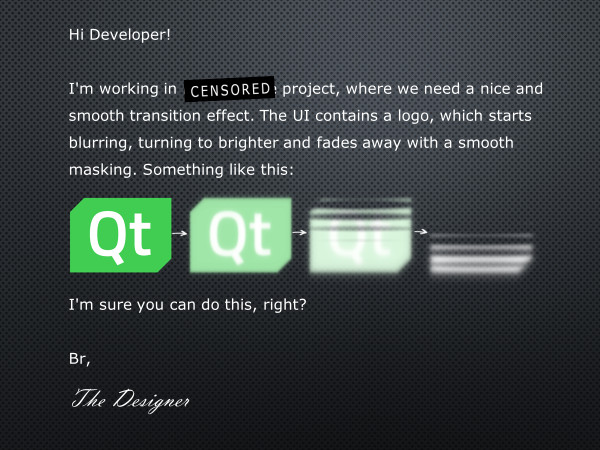
Seems easy to do with Qt Quick. You take a sip of coffee, roll up the sleeves and start coding. Luckily Qt Quick contains Graphical Effects which can be used for this. After coding a while, you end up with a functional effect and a tester application which looks like this:
The relevant source code for the effect is:
FastBlur {
    id: effect1
    anchors.fill: parent
    source: sourceItem
    radius: toolbar.effectValue * 150
    visible: false
}
BrightnessContrast {
    id: effect2
    anchors.fill: effect1
    source: effect1
    brightness: toolbar.effectValue * 2
    visible: false
}
Image {
    id: maskImage
    source: "mask.png"
    visible: false
}
ThresholdMask {
    id: effect3
    anchors.fill: effect2
    scale: 1.0 - 0.2 * toolbar.effectValue
    source: effect2
    maskSource: maskImage
    spread: 0.2
    threshold: toolbar.effectValue
}
So basically, you combine 3 graphical effects after each other: FastBlur, BrightnessContrast and ThresholdMask with a custom masking image. Being satisfied with this, you provide the effect and a small tester application to The Designer with a note "Did you mean something like this?" and continue being awesome for the rest of the day.
Next morning, a new email arrives. This time from The Project Manager.
OK, so nobody had mentioned to you that the customer runs this on an embedded device. And the effect you made yesterday was anyway just an initial version to get feedback. But that's OK. You know exactly what to do next: Implement the same effect as a single multieffect using the new Qt Quick Effect Maker.
Creating the effect using QQEM
Here's a video showing how to create the above effect with the Qt Quick Effect Maker using just nodes and properties.
As you can see, creating, testing, and exporting the effect with QQEM took only about 3 minutes. The source code to use the exported effect component in your application looks like this:
SmoothFadeEffect {
    anchors.fill: parent
    scale: 1.0 - 0.2 * toolbar.effectValue
    source: sourceItem
    blurHelperBlurMultiplier: 0.4
    fastBlurAmount: toolbar.effectValue * 1.5
    brightnessContrastBrightness: toolbar.effectValue * 2
    thresholdMaskThresholdLow: toolbar.effectValue
    thresholdMaskSpreadLow: 0.2
}
So instead of 3 separate effect components there is only one, with properties to control blur, brightness and masking.
Performance measurements
Now let's test the performance of the original Graphical Effects version vs. custom QQEM multi-effect. Testing is done on a beefy Samsung Galaxy Tab S8 with Adreno 730 GPU, increasing the amount of effect items animating on screen and measuring how that affects the framerate. Note that Tab S8 has higher frequency 120Hz screen.
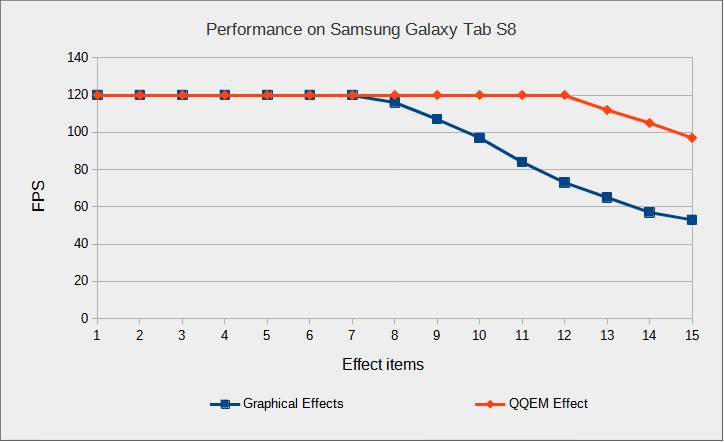
What we can see is that the initial effect using multiple Qt Graphical Effects maintains 120fps up to 7 effect items, while the QQEM multi-effect reaches solid 120fps still with 12 effect items: Combining effects into a single shader effect brings a notable performance gain.
You provide this custom effect to The Project Manager, it runs at solid 60fps on the customer target hardware and everyone is happy.
Conclusions
Let's conclude why you may want to create custom effects using QQEM:
- Performance: Chaining multiple Qt Graphical Effects requires an additional draw call, an additional set of shader passes and an additional offscreen buffer for each effect you add. QQEM composes the effect into a single draw call, shader & buffer.
- More effects: QQEM contains also effect nodes not available in Qt Graphical Effects. For example, Vignette, Noise, ColorLUT, NormalMapping etc. and all of these can be customized. This means that you have more effects to choose from, to reach the desired outcome.
- Customization: With QQEM you can create fully custom nodes, with custom shader code and properties. These custom nodes can be combined with the built-in nodes. This allows extending the effect while keeping the performance optimal.
The source codes of the example application with both versions of the effect are available in here. Convinced? See the instructions from the end of QQEM Introduction blog post and start making your own custom effects!


@Louis Yes that is close enought to be related, no worries. Scaling textures does have that blurring / aliasing effect, no matter if they have gone through effects or not. Generally it is better to first scale the content to preferred resolution then apply the effects.With Qt Quick items you can use "layer.smooth: true" for smoother linear scaling interpolation instead of just using nearest pixels. And when scaling down, especially smaller images like icons, use "layer.mipmap: true" to generate mipmap textures. When I do resposive UIs that scale to different resolutions I use big enough images with these.
Thank you for this! I already use mipmap and layer.smooth, but scaling up first is indeed probably the best thing to do when possible :)
So after using QQEM quite a bit for the past week I noticed something interesting about it. I enjoy using the text editor a lot! And seeing how it has code completion functionality, it made me think. QtQuick might be at the point now where you can make a fully featured IDE with it that actually works well on desktop. What are your thoughts on this? I couldn't find any existing opensource projects doing this. I'll be trying out some things in the coming weeks if my schedule allows it. Thanks for the great blogpost!
@Felix Thanks a lot for the feedback! Luckily it is weekend so I can tell my honest opinion... 😉
Yes, I belive Qt Quick (and Quick Controls) start to suit well also desktop applications. As Quick Controls 2 was originally designed for touch-based mobile UIs with simplicity and performance in mind, desktop usage with more complex widgets, mouse interaction, native themes etc. have been lacking. But this has improved and will improve with future Qt 6.x versions. As mentioned in the introduction blog post, one of the goals of QQEM was to do dogfooding with Qt Quick, find the issues and improve.
Also nice that you have found code completion (Crtl + space), have you also tried auto indent (Ctrl + i)? These are a bit hidden still because they are "just simple" implementations and not fully-featured. When it comes to more complex text editing, Qt advice tends to be using QWidgets (like e.g. Qt Creator does) but we should aim Qt Quick TextArea to match most of users needs and allow extending the editor capabilities with documented C++ API.
As you (and others out there) have used QQEM, please make tickets into https://bugreports.qt.io or reach out in any other way. I really want to prioritize the development & features based of feedback from real users like you and me!
Thank you for this, that looks very interesting and promising!
There is just one thing that prevents me from using this kind of stuff, which is that whenever you combine scale + effects, somehow (maybe because effects create textures or similar under the hood) fonts for example will appear blurry because scale then affects the texture and no longer the text. Images have similar issues as well (even if image is big, but is scaled down through lower width/height for example).
Not sure if you have encountered this use-case before? This is particularly interesting for example to support a single resolution for multi-screen displays through calculated scales (a bit how Felgo does with GameWindow and Scene).
Sorry if it's not fully related to the topic.
Hello guys! In order to add effects, I use editor on this page https://wave.video/blog/go-instagram-live-on-computer is rich in various editing tools and helps me to complete the tasks
Hello. Thanks for sharing valuable information. Perhaps this application will help me to do my graduation project in programming better. After all, this is very important to me. And I even asked for help with my java homework https://getcodinghelp.com/do-my-java-assignment from professional talented programmers, so that I could be completely sure of the result. That way I can avoid stupid mistakes and get things right.