If you are unable to install Squish on the device you want to test, and you are using a GUI toolkit not supported by Squish so that using the Built-In Hook is not an option, you might still be able to test your application using Squish for Windows and Image-based object lookup via Virtual Network Computing (VNC).
VNC is a graphical desktop sharing system. A VNC server captures the screen of the remote system and sends it to a VNC client, which in return will send mouse and keyboard input commands back to the VNC server to automate it. In this process, any deeper knowledge about the application on the remote system is lost, but Squish can still use the visual appearance of the application to automate it.
This article will not cover setting up and starting the vnc server on the remote system, but expects you to have a working VNC setup.
Picking a VNC-Client
There are several options when it comes to VNC Clients for Windows. This article looks at UltraVNC and VNC Viewer from RealVNC, which can be automated in almost the exact same way.
Setting up the Test Suite
When automating an application via VNC, the AUT that you need to configure within Squish for Windows will be the VNC Client itself. Both clients we selected for this article are launched through an executable called vncviewer.exe which you will have to select as your AUT. You can supply the IP-Address and Port of the VNC Server as a command line argument for either client.
If your VNC server is located at 192.168.0.101 and uses port 5900, the AUT configuration in the test suite settings of the IDE should look like the following:

Connection and Login
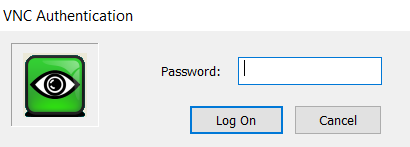
Depending on whether your VNC server requires password authentication, a password prompt should be shown once you start recording your first test case. The password prompt can be automated just like any other Windows AUT.


Automating the Actual AUT
After the password prompt, all further automation will take place on the VNC client’s main window. All keyboard input should automatically send to that window, and for all mouse clicks you will have to use Squish’s Image-based object lookup.
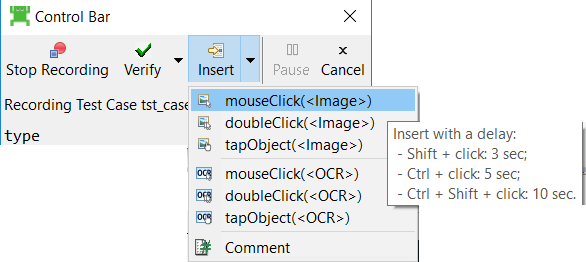
The following graphic shows how to insert an Image-based object lookup using the Squish Control Bar during recording of a test case. The image also shows a preview of the OCR-based Object Lookup which will be introduced in Squish 6.5 and which is also applicable for automation via VNC.

Example Test Scripts
To demo the automation via VNC, we will use Squish’s addressbook example application running on a remote machine. The example application is started using a desktop shortcut and afterwards the test adds an entry to the address book and verifies that a row has been created.
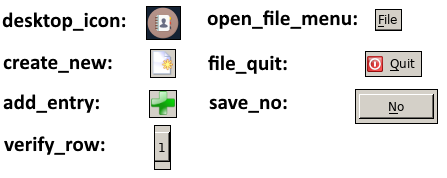
The following graphic shows the images we generated for the Image-Based object lookup. Because the GUI is dependent on the system on which it is running, you likely will not be able to reuse these images.

Using these images and names, we arrive at the following test script and scripted object map:
test.py of vnc automation
# -*- coding: utf-8 -*-

import names

def addEntry():
#Click on the add button
mouseClick(waitForImage("add_entry",{ "tolerant": True, "threshold": 99.822 }))

#Type in details for new entry
type(waitForObject(names.vncViewerWindow), "John")
type(waitForObject(names.vncViewerWindow), "<Tab>")
snooze(0.1)
type(waitForObject(names.vncViewerWindow), "Doe")
type(waitForObject(names.vncViewerWindow), "<Tab>")
snooze(0.1)
type(waitForObject(names.vncViewerWindow), "John.Doe@froglogic.com")
type(waitForObject(names.vncViewerWindow), "<Tab>")
snooze(0.1)
type(waitForObject(names.vncViewerWindow), "11880")
type(waitForObject(names.vncViewerWindow), "<Return>")

def main():
#Start vnc viewer
startApplication("vncviewer 192.168.0.101::5900")

#Enter password in vnc viewer authentication dialog
mouseClick(waitForObject(names.vncAuthenticationPasswordField), 32, 14, MouseButton.PrimaryButton)
type(waitForObject(names.vncAuthenticationPasswordField), "securepassword")
type(waitForObject(names.vncAuthenticationPasswordField), "<Return>")

#Start actual AUT via desktop icon
doubleClick(waitForImage("desktop_icon",{ "tolerant": True, "threshold": 99.745 }))

#Create new address book
mouseClick(waitForImage("create_new",{ "tolerant": True, "threshold": 99.997 }))

#Add address book entry
addEntry()

#Verify a row has been created. Note that Squish 6.5 will have test.imagePresent(...)
waitForImage("verify_row", {"timeout": 1000,"tolerant":True,"threshold":99.255})

#Close the application without saving changes
mouseClick(waitForImage("open_file_menu",{ "tolerant": True, "threshold": 99.587 }))
mouseClick(waitForImage("file_quit",{ "tolerant": True, "threshold": 99.521 }))
mouseClick(waitForImage("save_no",{ "tolerant": True, "threshold": 99.412 }))
names.py of vnc automation with UltraVNC
# encoding: UTF-8

from objectmaphelper import *

vncAuthenticationDialog = {"text": Wildcard("VNC Authentication*"), "type": "Dialog"}
vncAuthenticationPasswordLabel = {"container": vncAuthenticationDialog, "text": "Password:", "type": "Label"}
vncAuthenticationPasswordField = {"container": vncAuthenticationDialog, "leftObject": vncAuthenticationPasswordLabel, "type": "Edit"}
vncViewerWindow = {"text": "name-of-remote-machine:0.0 ", "type": "Window"}
names.py of vnc automation with VNC Viewer
# encoding: UTF-8

from objectmaphelper import *

authenticationWindow = {"text": "Authentifizierung", "type": "Window"}
vncAuthenticationPasswordLabel = {"container": authenticationWindow, "text": "Kennwort:", "type": "Label"}
vncAuthenticationPasswordField = {"container": authenticationWindow, "leftObject": vncAuthenticationPasswordLabel, "type": "Edit"}
vncViewerWindow = {"text": Wildcard("* – VNC Viewer"), "type": "Window"}
We can use the same test script for both clients, so that the only difference lies within the script-based object maps, as the properties of the login dialogs differ slightly.
VNC Image Quality
When using VNC, the image quality may vary depending on the quality of the connection or the viewer settings. In order to optimize the connection, the images taken from the remote system are compressed which may lead to image artifacts. You will notice that each of the waitForImage(…) calls has the tolerant and threshold parameters set. This accounts for these slight changes in an image’s appearance. The values for the threshold can be auto-generated by Squish on playback of the script.


