Executing automated GUI tests using the Continuous Integration/Continuous Deployment (CI/CD) system Jenkins is a popular approach to streamlining automation. However, the computer on which to execute the test suite through Jenkins may be "headless." That is, it may not have a physical display connected to it, or it may not have a graphical log on session in which the GUI application could eventually be rendered. Both points are commonly the case with rack-based computer systems, and both points may interfere with GUI automation in general.
Here, we discuss headless execution of GUI tests created with the Squish GUI Tester, using the Jenkins server on Unix platforms. We'll walk through using our Squish-Jenkins integration plugin to get the kind of fast results and quick feedback you need for your project.
Potential Problems in Headless Setups
In such headless setups, one typically receives error messages related to lack of a logical display. When using Squish, these error messages are visible in the build's page at Squish report > Server Log. Possible error messages include:
qt.qpa.screen: QXcbConnection: Could not connect to display
Could not connect to any X display.
application-specific initialization failed: no display name and no $DISPLAY environment variableERROR:browser_main_loop.cc(1485)] Unable to open X display.Error: no DISPLAY environment variable specifiedqt.qpa.xcb: could not connect to display qt.qpa.plugin: Could not load the Qt platform plugin "xcb" in "" even though it was found. This application failed to start because no Qt platform plugin could be initialized. Reinstalling the application may fix this problem. Available platform plugins are: xcb.
Solution: Virtual Displays
For Unix systems, "virtual" displays can be used to avoid the need for a graphical log on session and/or a physical display for the computer where the tests should be executed.
One popular virtual display solution for Unix systems is Xvfb. Using Xvfb inside of a Jenkins project is easy when using the Jenkins Xvfb plugin.
To install and use this plugin in a Jenkins project, follow the steps outlined below:
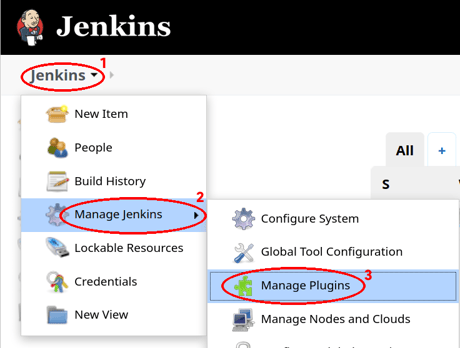
Step 1: Open Jenkins Plugins Manager
- Go to Jenkins (1) > Manage Jenkins (2) > Manage Plugins (3):
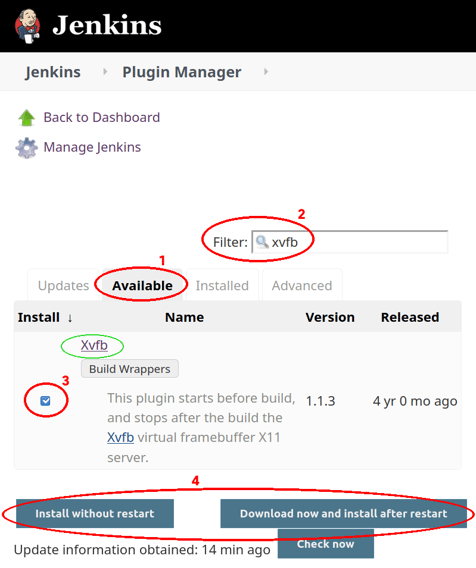
Step 2: Install Xvfb Jenkins Plugin
- Select Available (1)
- Enter "xvfb" into Filter: (2)
- Check checkbox of entry Xvfb (3)
- Click Install without restart or Download now and install after restart (4)
Xvfb is often already installed on Unix systems. To test if it is installed, simply execute which xvfb in a shell to see if it is found. (To install Xvfb on Ubuntu, execute sudo apt install xvfb in a shell.)
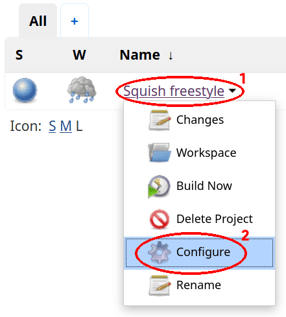
Step 3: Open Jenkins Project Configuration
- Open the desired Jenkins project's configuration (1, 2):
Step 4: Enable Xvfb Plugin for the Project
- Select Build Environment (1)
- Check checkbox Start Xvfb before the build, and shut it down after. (2):

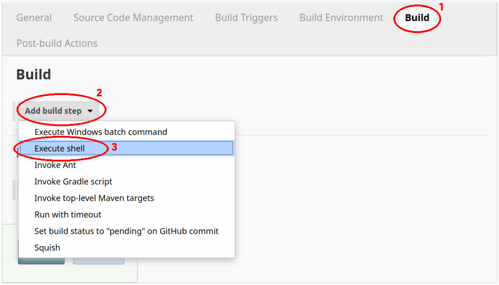
Step 5: Add a Shell Build Step
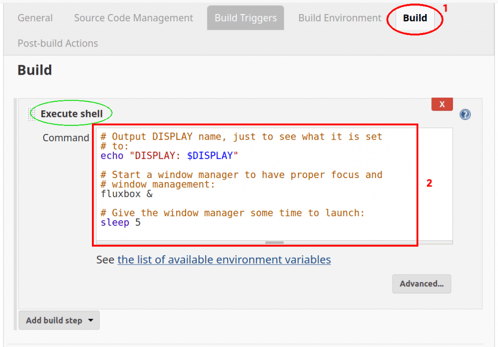
- Select Build (1), Add build step (2), Execute shell :
Step 6: Enter Shell Script
- Select Build (1)
- At Command (2) enter the following:
# Output DISPLAY name, just to set what it is set
# to:
echo "DISPLAY: $DISPLAY"

# Start a window manager to have proper focus and
# window management:
fluxbox &

# Give the window manager some time to launch:
sleep 5
For this, it is required that the "fluxbox" window manager be installed. But in general, you can use any other windows manager. (To install fluxbox on Ubuntu, execute sudo apt-get install fluxbox.)
Also, it is important to have this step before any Squish build step (see below).
Step 7: Add Squish Build Step
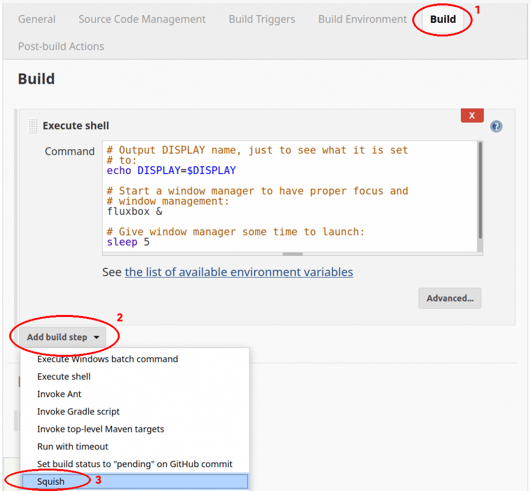
- Add the desired Squish build steps via Add build step (2) > Squish (3):
Wrap-Up
Using the Jenkins integration plugin, it's easy to setup automated execution of GUI tests, even on computers without a display or monitor attached. Using a Continuous Integration tool like Jenkins provides users with the ability to launch their GUI tests via a simple mouse click, or trigger them by changes to their application or the test scripts themselves.
.webp)


