Ho-ho-ho and happy holidays everyone! I noticed that I have done only a single blog post during this year, so what would be a better way to end the 2023 than a new post!
One thing that I have been asked more than once this year by designers and other Qt users is how to achieve UI with blurred panels? Besides being a nice effect, this has also usability aspect for allowing content of the panel to be readable over any background. So I'll explain how to do it easily using Qt Quick MultiEffect and then I can also next time just refer the questioner to check this post.
Traditionally at this point, we check a video of what we want to achieve. Like this:
Design-oriented persons sometimes first try to implement this by adding a semi-transparent panel (say QML Rectangle) and then applying a blur effect to this panel. This is however wrong, as blurring the rectangle doesn't actually do anything. You have to think of this in layers: we don't blur the panel but the content behind it. So either you take part of the background and blur that (like in our simple case) or you blur a bigger area and mask the blurred item (like in our advanced case).
Simple case
Let's start with a simple UI with 2 main parts: content and a blurred panel/toolbar. (Well it isn't that simple as I got carried away blasting Scooter & Armin van Buuren from headphones while implementing it...😆)
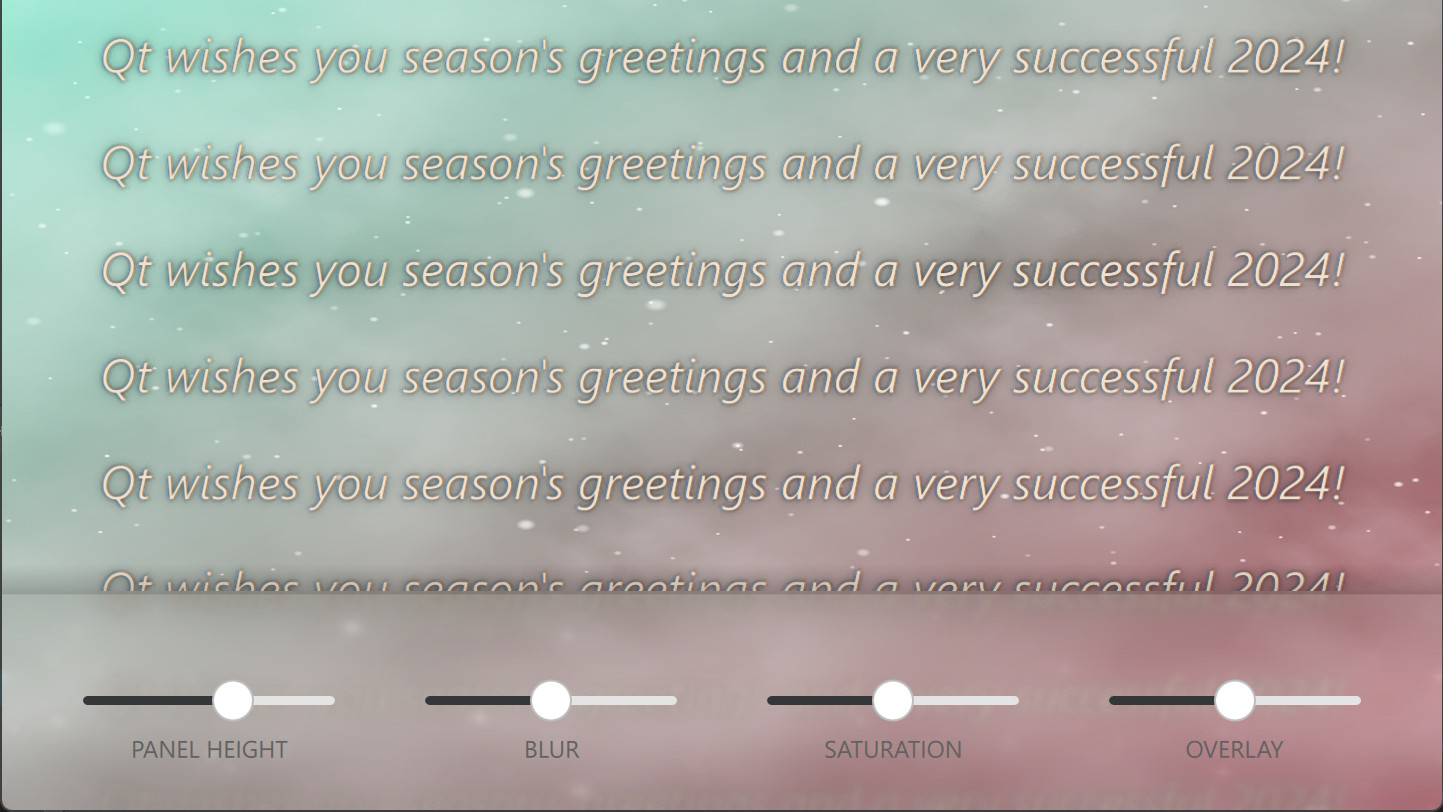
First, we have a snowy background effect to demonstrate dynamic blurring. This was created using QQEM and can be modified by opening SnowyEffect.qep in case you are interested. From this, we take a offscreen texture as a source for the blur.
ShaderEffectSource {
    id: effectSource
    anchors.fill: parent
    sourceItem: backgroundItem
    sourceRect: Qt.rect(0, backgroundItem.height - rootItem.panelHeight, backgroundItem.width, rootItem.panelHeight)
    visible: false
}
That sourceRect is important so that we blur just a part of the background. Also, fewer pixels to blur means more performance, which is important especially when targeting mobile/embedded hardware.
After this we do the blurring easily using MultiEffect
MultiEffect {
    anchors.fill: effectSource
    source: effectSource
    autoPaddingEnabled: false
    blurEnabled: true
    blurMax: 64
    blur: blurSlider.value
    saturation: saturationSlider.value
}
Autopadding is disabled, so that blurred item size doesn't grow. We could easily add also other effects here like colorization or contrast, but let's settle for blur and saturation this time. Those are adjusted using sliders on the toolbar.
Then we add overlay image on top of the toolbar, which gives us nice gradient and shadow.
Image {
    anchors.fill: parent
    // Extend up with the shadow amount
    anchors.topMargin: - rootItem.panelHeight / 8
    source: "toolbar_background.png"
    opacity: overlayOpacitySlider.value
}
The image is placed higher than the blurred toolbar by the shadow amount, and opacity is adjusted with a toolbar slider. That's it! Now we have a nice blurred panel at the bottom of our UI.
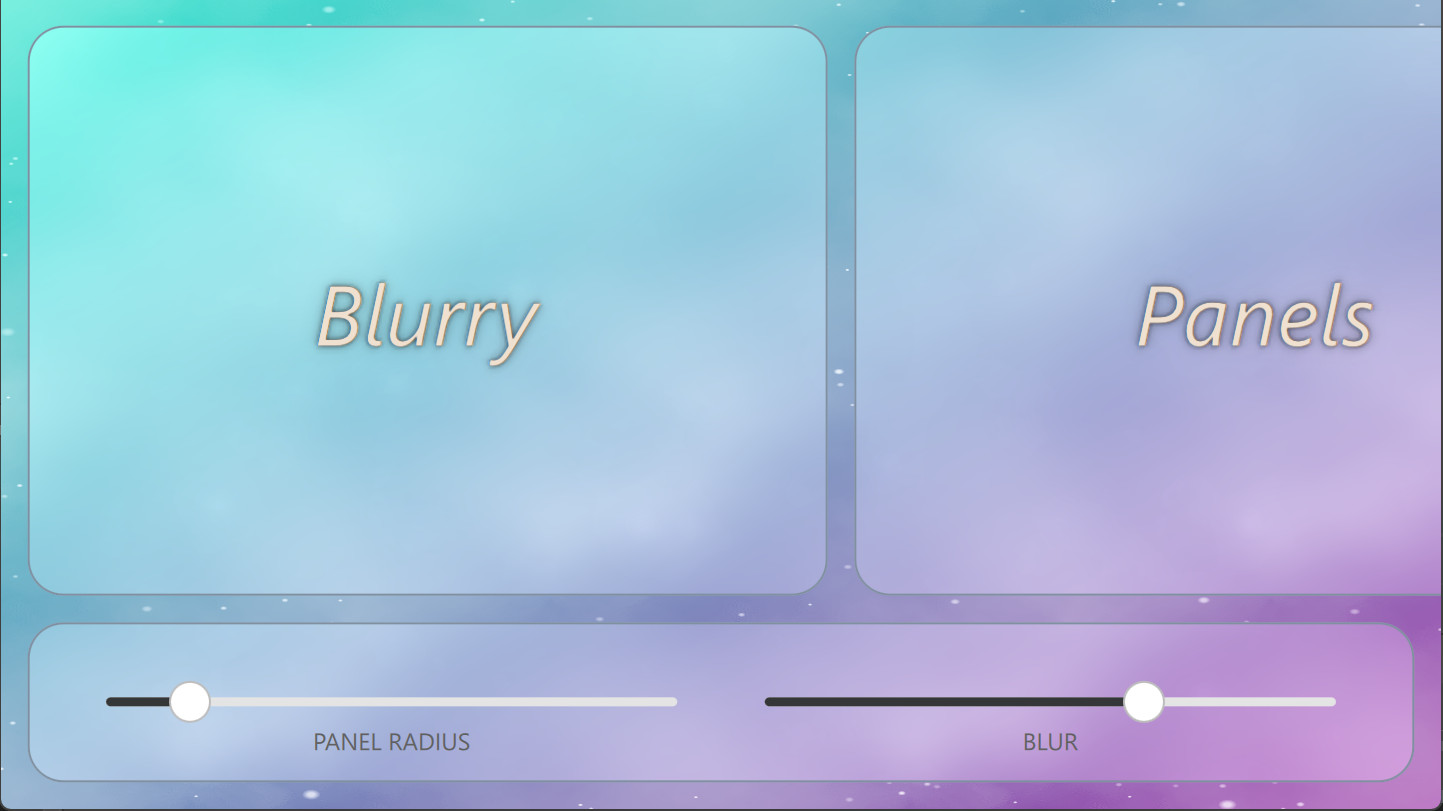
Advanced case
Sometimes the panels you want to blur need to be non-rectangular and animate. In this case, you can combine the blur and mask effects with the MultiEffect.
We start this by defining a separate masking item:
Item {
    id: maskItem
    anchors.fill: panelArea
    layer.enabled: true
    layer.smooth: true
    visible: false
    component PanelMask : Rectangle {
        required property Item item
        property real listPosX: flickable.contentX
        x: item.x - listPosX
        y: item.y
        width: item.width
        height: item.height
        radius: item.radius
    }
    PanelMask {
        item: toolbar
        listPosX: 0
    }
    PanelMask {
        item: panel1
    }
    PanelMask {
        item: panel2
    }
    PanelMask {
        item: panel3
    }
}
This masking item contains panels that follow the position, size and radius of the actual panels. The main reason to use a separate masking item instead of using panels view (panelArea) directly as a mask, is that this way the blur effect does not need to update whenever content on the panel's updates (say the text is scrolled or slider is moved). The mask source is only updated when the properties that affect the masking (size, position, radius) change.
MultiEffect is similar than in the previous simple example:
MultiEffect {
    anchors.fill: parent
    source: backgroundItem
    autoPaddingEnabled: false
    maskEnabled: true
    maskSource: maskItem
    maskThresholdMin: 0.5
    maskSpreadAtMin: 1.0
    blurEnabled: true
    blurMax: 80
    blur: blurSlider.value
    saturation: -0.1
    brightness: 0.1
}
The main difference is that this time we also use the masking feature. The way MultiEffect works is that masking is applied after the blurring. Those threshold and spread properties are used to take into account the mask item opacity (similar to GraphicalEffects OpacityMask) so we avoid aliasing.
Then we create our actual custom panel component:
component Panel: Rectangle {
    id: component
    property string text
    width: 600 * px
    height: rootItem.height - toolbar.height - 3 * marg
    y: marg
    radius: panelRadiusSlider.value
    color: "transparent"
    border.width: 1
    border.color: "#8090a0"
    Text {
        ...
    }
}
And use these panels in the toolbar and inside the Flickable item:
Flickable {
    id: flickable
    anchors.fill: parent
    anchors.bottomMargin: toolbar.height + 2 * marg
    contentWidth: panelRow.width
    leftMargin: marg
    rightMargin: marg
    Row {
        id: panelRow
        spacing: marg
        Panel {
            id: panel1
            text: "Blurry"
        }
        Panel {
            id: panel2
            text: "Panels"
        }
        Panel {
            id: panel3
            text: "Rock!"
        }
    }
}
This ends our advanced example. Feel free to look for more details from the example source codes.
Conclusion
The main conclusion is that it is easy to implement blurred panels using Qt Quick and MultiEffect. As long as you are mindful of the pixel amount and the frequency of the blurring updates, this effect can also be performant on modern GPUs.
You can find source codes of these examples at: https://git.qt.io/kagronho/blurredpanels
As the year comes to a close, we want to express our gratitude for your continued support. Happy holidays and a prosperous New Year!


Commenting for this post has ended.
Very insightful. Thanks for the tip about using a separate masking item instead of the panels directly.
@Carlos Thanks! Yes, as blurring can be costly it is important to keep it optimal.
@Lolol Maybe you missed the ShaderEffectSource & sourceRect part, which was exactly to limit the blurred areas. In the second example we blur the whole area because panels cover ~90% of the area, so it is more performant to do a single blur. You can limit the blurred areas with ShaderEffectSource also with masking when that matches the UI needs. Tip: When performance is more important than blur quality, you can reduce the textureSize: https://doc.qt.io/qt-6/qml-qtquick-shadereffectsource.html#textureSize-prop
That's still convoluted, every other toolkit (be it Apple, Flutter, even CSS) easily let's you add an effect behind an item during its rendering pass.
Yes, CSS for example has "backdrop-filter" which can support also blur (https://developer.mozilla.org/en-US/docs/Web/CSS/backdrop-filter). This is easier for users and we could consider some similar QML element / property into Qt Quick.
However, this is not easy for the backend renderer to optimize as it doesn't e.g. know if / how much the panels resize / move. When you have this control with ShaderEffectSource, you can e.g. design UI with static background so that slow blurring is done only once and when the panel moves, only cheap masking operations are required. If you don't believe me, check e.g. this Flutter ticket about BackdropFilter performance struggles 🙂https://github.com/flutter/flutter/issues/32804
But sometimes easy to use API can overcome better control, so please make a ticket how you would propose this "effect behind an item" to be brought into Qt Quick. Thanks!
I've tried implementing a backdrop-filter-like effect using QtQuick, but due to limitations in QRhi's design, its implementation is very crude. It has been discussed here: QTBUG-120519. If you're interested, you can help me improve it.
Still don't seem to have any way to blur content behind our main window though unless I'm misunderstanding here... That's the only thing I've been wanting for years.
Window background blurring is operating system / window manager level feature, so it is done differently on Android, Linux/Mutter etc. This makes cross-platform API for it tricky, but there are tickets (QTBUG-104321, QTBUG-85310) to consider this. Applications can't get access into the texture behind the window, so methods in this post don't apply.
I used to do it like this before MultiEffect. The combination of the opacityMask is really useful thanks. One thing I'm wondering about still though is for a correct analog to a blurred panel (a diffuse piece of glass above something) the sourcerect of the shadereffectsource would need to be slightly larger than the panel itself to collect neighboring pixels depending on the blur radius. Do you think that bit matters for the quality of the illusion?
Yes, you are right that it would give better illusion! If that is important, then you should make ShaderEffectSource sourceRect bigger (and maybe the whole background item bigger) and use mask to only show the correct part. You might also want to scale the ShaderEffectSource for "lens magnification" effect that piece of glass would do. All this has some performance penalty, but that's the educated decision you are willing to take 🙂
Ah I see, yes that makes total sense. Thanks! Keep these articles coming. Always nice reading them
I think this awesome article misses one little (but the most important) point: basically, it's currently not possible to make a standalone item that would simply blur its background independently of wherever it's being placed. In other words, the composability of this solution is close to zero. A developer would need to craft the implementation manually for each such a screen. That's because the actual background and an item with blur have to be siblings which is somewhat unnatural as we all got used to just nest items into each other in QML. And with nesting this just won't work because the shader will become a part of hierarchy for the shader's source which is not allowed.
I tried to make this clear in the first section "You have to think of this in layers: we don't blur the panel but the content behind it.". I totally understand how CSS backdrop-filter way of "just blur everything behind this item" can feel natural. But it can also be inefficient, as you don't have control to what triggers the blur updates and how big area gets blurred. With the Qt ShaderEffectSource method you can control these, avoiding heavy blur operations, although you are right that it does require some manual crafting.
There is a big difference between “you can control” and “you must always control”.
Yes, you're right. Controlling layering manually to achieve the effect can indeed avoid unknown performance issues. However, this doesn't prove that backdrop-filter shouldn't exist. I believe QtQuick needs it because not all situations can achieve the effects brought by backdrop-filter through manual layering control; they are not equivalent. Additionally, developers themselves can assess whether the performance issues caused by backdrop-filter are acceptable. We should let developers make their own choices rather than telling them that backdrop-filter might cause performance issues, so we can't provide it.
I've tried implementing a backdrop-filter-like effect using QtQuick, but due to limitations in QRhi's design, its implementation is very crude. It has been discussed here: QTBUG-120519. If you're interested, you can help me improve it.
This is not an easy-to-use feature. For example, if I want to add a blurry background effect to a Menu (this is a menu within a window, not a native menu), what should I do? I don't know which item to specify as the
sourceproperty of MultiEffect. Should it be the contentItem of the Window? No, it shouldn't, because I don't know where this Menu will be used. This is a feature that QtQuick cannot currently implement. I need to be able to access the background content of an item during the rendering process and pass it to MultiEffect for post-processing. Qt does not support doing this. It's worth noting that I implemented this effect in a less-than-ideal way, but it's not perfect, so I reported a bug to discuss it: QTBUG-120519. Could you discuss the solution with me?That's a joke, right? Blurring the entire scene just to cut out a few parts for a backdrop is a recipe for disaster performance-wise. What we need is a proper way to do a region backdrop and none of this nonsense.
Replied to this already above. In the advanced case, single blur + mask is actually more performant than several smaller blurs.