MinGW and Side-by-Side Manifests
November 14, 2024 by Cristian Adam | Comments
Qt Creator 14 has removed support for its Python 2 pretty printers.
This meant that Qt 5.15.x 32 and 64 bit users would not be able to debug their applications using the Qt 5.15.x MinGW Kit, which uses MinGW 8.1 and GDB 8.1 😱
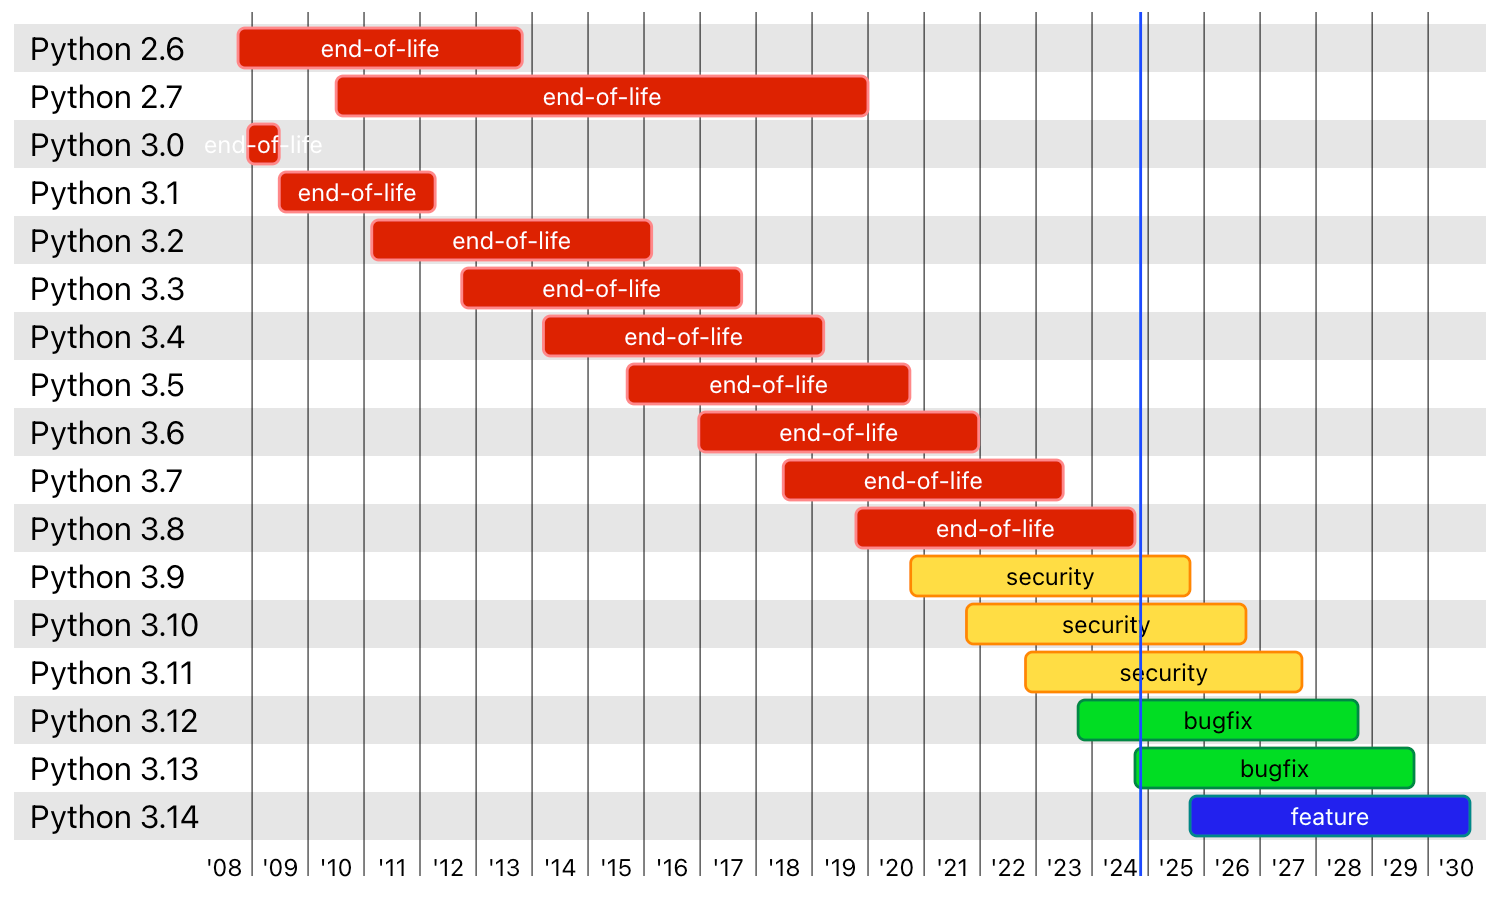
In the timeline below you can see that Python 2.7 support concluded at the end of 2019.

But if we look at Qt Releases we can see that Qt 5.15.x is still supported until 2025!
The easy solution would be to just update GDB 11.2.0 from the MinGW 11.2.0 package, which uses Python 3 for the GDB pretty printers.
There is an issue though: GDB has a C++ Runtime dependency in form of DLL files, which are also shared by other tools from the toolchain (gcc compiler for example) and they are incompatible between MinGW version 8.1 and 11.2.
The files in question are:
- libgcc_s_seh-1.dll
- libstdc++-6.dll
- libwinpthread-1.dll
Users of Visual C++ might know what an Application xml manifest file is.
An application manifest (also known as a side-by-side application manifest, or a fusion manifest) is an XML file that describes and identifies the shared and private side-by-side assemblies that an application should bind to at run time. These should be the same assembly versions that were used to test the application. Application manifests might also describe metadata for files that are private to the application.
Applications built by MinGW GCC usually do not have such a manifest file.
This xml file will have to be included in the executable as a resource by using the mt.exe tool (LLVM offers a llvm-mt.exe alternative).
How would such an xml manifest look like?
<assembly xmlns="urn:schemas-microsoft-com:asm.v1" manifestVersion="1.0">
  <dependency>
    <dependentAssembly>
      <assemblyIdentity type="win32" name="gdb.mingw.sxs" version="11.2.0.0" processorArchitecture="amd64"></assemblyIdentity>
    </dependentAssembly>
  </dependency>
</assembly>
And for x86 like this:
<assembly xmlns="urn:schemas-microsoft-com:asm.v1" manifestVersion="1.0">
  <dependency>
    <dependentAssembly>
      <assemblyIdentity type="win32" name="gdb.mingw.sxs" version="11.2.0.0" processorArchitecture="x86"></assemblyIdentity>
    </dependentAssembly>
  </dependency>
</assembly>
Then, I’ve included the file in the gdborig.exe and gdbserver.exe executables like this:
$ mt.exe -nologo -manifest "appmanifest.xml" -outputresource:"gdborig.exe;#1"The next step is to create a gdb.mingw.sxs directory and copy the following files into it:
- gdb.mingw.sxs.manifest
- libgcc_s_seh-1.dll
- libstdc++-6.dll
- libwinpthread-1.dll
After that, the gdb.mingw.sxs.manifest looks like this for x86_64:
<?xml version="1.0" encoding="UTF-8" standalone="yes"?>
<assembly xmlns="urn:schemas-microsoft-com:asm.v1" manifestVersion="1.0">
   <noInheritable/>
   <assemblyIdentity type="win32" name="gdb.mingw.sxs" version="11.2.0.0" processorArchitecture="amd64"/>
   <file name="libgcc_s_seh-1.dll" hash="96eeefab4af1670cc59e9a77b5f93c65a85ac181" hashalg="SHA1"/>
   <file name="libstdc++-6.dll" hash="92c59fa3fddf375ee27601975c10b44882d9ecd0" hashalg="SHA1"/>
   <file name="libwinpthread-1.dll" hash="96387d1c8e3bfbcaeb05fda32c031468417afb7b" hashalg="SHA1"/>
</assembly>
And for x86 like this:
<?xml version="1.0" encoding="UTF-8" standalone="yes"?>
<assembly xmlns="urn:schemas-microsoft-com:asm.v1" manifestVersion="1.0">
   <noInheritable/>
   <assemblyIdentity type="win32" name="gdb.mingw.sxs" version="11.2.0.0" processorArchitecture="x86"/>
   <file name="libgcc_s_dw2-1.dll" hash="08d3beb878ccdc4c516d51e98e66fd10be1ea239" hashalg="SHA1"/>
   <file name="libstdc++-6.dll" hash="92f9c0504b554c17092d52e72bde7d48723c1589" hashalg="SHA1"/>
   <file name="libwinpthread-1.dll" hash="13b8af525e224f7f69cf1bbe879aa284344d5e0e" hashalg="SHA1"/>
</assembly>
With all this in place, the gdb.exe 11.2.0 would start in a MinGW 8.1 toolchain directory! 🎉
In order to have a fully working gdb.exe, some Python dependencies need to be also packaged. You can get the GDB packages from QTBUG-128398 or conveniently using the Qt SDK!
Blog Topics:
Comments
Subscribe to our newsletter
Subscribe Newsletter
Try Qt 6.9 Now!
Download the latest release here: www.qt.io/download.
Qt 6.9 is now available, with new features and improvements for application developers and device creators.
We're Hiring
Check out all our open positions here and follow us on Instagram to see what it's like to be #QtPeople.


